Building a dedicated Kubernetes cluster on Hetzner
Kubernetes works great anywhere (raspberry pis are our favorite), and can turn any pile of hardware into a production-ready cluster. Today we're going to talk about how to build a Kubernetes cluster using Hetzner Dedicated servers. Hetzner has excellent pricing - combined with Kubernetes we can also create a reliable system out of potentially less reliable servers - cheap, reliable, and fast - is it possible?
We'll be building a vanilla cluster using kubespray for provisioning, but this tutorial will mostly focus on the Hetzner specific pieces - if you're looking for a more generic kubespray tutorial, checkout RedHat's tutorial or the official docs.
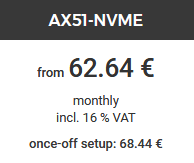
For our cluster's workers we'll be using three of Hetzner's AX51 servers, and for the master we'll be using one AX41 server. All together this comes to about $315/month. A rough calculation suggests that (although not entirely equal in many many ways), this is slightly less than an order of magnitude cheaper than equivalent AWS compute, memory and NVMe. Another way to think about it is that you could have a dedicated Hetzner server with KubeSail enterprise support for about the same price as an un-managed AWS cluster!

In total, this give us 24CPUs, 192GB of RAM and 7TB of NVMe SSDs. Not too shabby by far!
For this tutorial, we'll be using (and we suggest) Ubuntu 20.04, however, most steps should work with any modern distribution. Note that we'll assume you can setup an SSH key and access the systems.
Firewall
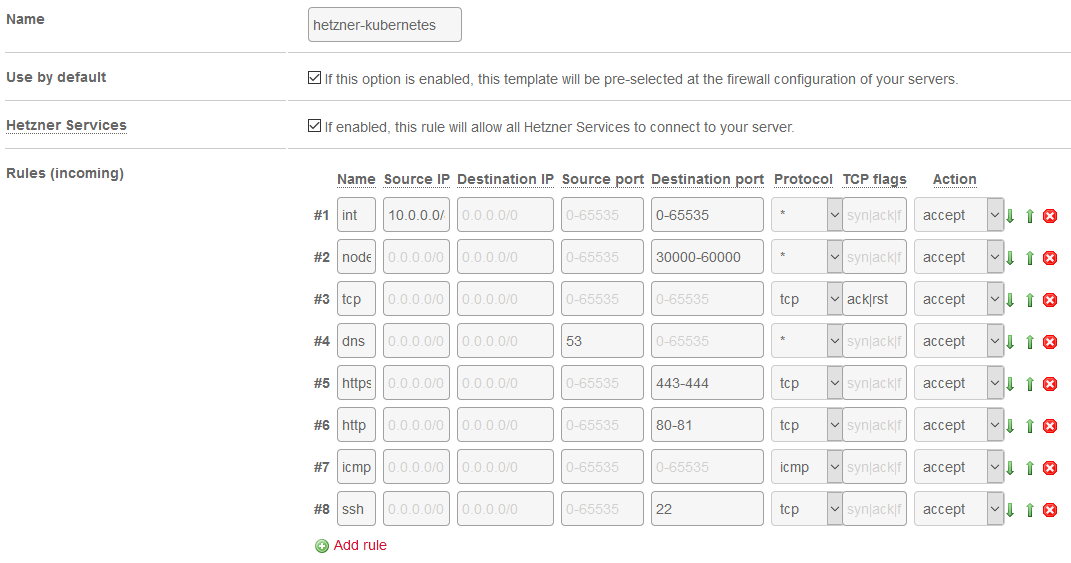
First, create a new firewall template for our nodes. We'll make it the default for all servers. Remember the Kubernetes networking system requires an open, flat network between our nodes.

Some notes:
-
Rule #2: Only use this if you plan on exposing high-port services! You may not need this, and it can possibly lead to security concerns, so it should be disabled unless you know you need it!
-
Rule #4: Hetzner firewall works both directions - so you'll need to enable outbound DNS!
Name your servers sanely
Typically in Kubernetes, our servers are cattle, not pets. However, in a dedicated world, servers don't come and go willy-nilly - and thus it's safe and helpful to give them reasonable names. You can do this in the Hetzner console:

It's important to keep the mapping of address and names handy, we'll create an Ansible inventory with it shortly!
Setup networking
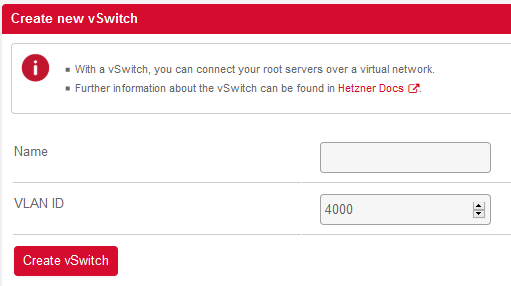
Hetzner dedicated console contains a product called a vSwitch, a virtual networking device for your hardware. Create a new vSwitch with VLAN ID 4000.

Make sure to add each of your servers (workers and masters) to the vSwitch. This will form our internal network. On all of the systems, we'll want to create a network interface which uses our new vSwitch, for example our 2nd worker might look like this:
After this step, each system should be able to ping each other (ie:
ping 10.1.0.101...)Load Balancer
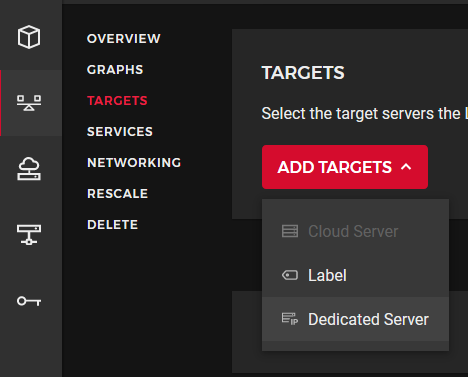
You'll want a load balancer for ingress - luckily Hetzner Cloud Load Balancers now support dedicated servers! Head over to the Hetzner cloud console and create a new load balancer. You can add dedicated servers under the "targets" section:

We'll target "444" here, as that's where we'll expose our Ingress controller system. Note that "443" is used internally by kubespray, and you should not bind HostPort services on port 443. Our load balancer itself can safely listen on port 443.
System setup
Ideally, we'll provision Kubernetes via Ansible, and then everything we need to deal with via Kubernetes. However, there may be some reason you'll want to do some manual setup on the hosts. At the very least, we can ensure some basic tools that Ansible and sysadmins might need are installed:
Ansible setup
-
Install Ansible (this can be a non-trivial task, but I recommend starting by trying
pip3 install ansible). -
Next, clone kubespray into a directory, and create a directory inside
kubespray/inventory/(we'll call oursmkdir -p kubespray/inventory/hetznerfor now). -
Install mitogen, which dramatically speeds up Ansible execution:
- Create an inventory file,
kubespray/inventory/hetzner/inventory.ini, and fill out the details:
Next, let's define some base variables for kubespray in
kubespray/inventory/hetzner/group_vars/all.ymlProvisioning the cluster
From now on, you can run:
And you should be off to the races! If you login to the master node,
kubectl get nodes should return how you'd expect! Now is a good time to install the KubeSail agent!Notes for Cloud-less Kubernetes
One aspect of the
cloud_provider: external choice above is that we lose a few features:- Kubernetes will not be able to determine the correct public IP address of the node
- Nodes will never be marked as ready for containers (and you might pull your hair out!)
Let's fix both:
Fixing a Node's ExternalIP field
Here is an example script which assigns a new External IP address to a node - this can be run to set the external addresses from Hetzner into Kubernetes.
NODE_NAME="worker-3"
NODE_EXTERNAL_IP="SOME_IP_ADDRESS_HERE"
NAMESPACE="kube-system"
SERVICEACCT="default"

K8STOKEN=$(kubectl -n ${NAMESPACE} get secrets -o jsonpath="{.items[?(@.metadata.annotations['kubernetes\.io/service-account\.name']=='${SERVICEACCT}')].data.token}"|base64 --decode)

curl -k -v -XPATCH \
  -H "Accept: application/json" \
  --header "Authorization: Bearer ${K8STOKEN}" \
  -H "Content-Type: application/json-patch+json" \
  https://MY_KUBERNETES_SERVER:6443/api/v1/nodes/${NODE_NAME}/status \
  --data '[{"op":"add","path":"/status/addresses/-", "value": {"type": "ExternalIP", "address": "${NODE_EXTERNAL_IP}"} }]'

# To elevate a SA to cluster-admin in order to do the above: example:
kubectl -n kube-system create clusterrolebinding default-admin --clusterrole=cluster-admin --serviceaccount=kube-system:default

# Cleanup the admin role after if you no longer need it:
kubectl -n kube-system delete clusterrolebinding default-admin
Marking an cloudless Node as ready
Remove the `node.cloudprovider.kubernetes.io/uninitialized taint:
Ingress system
Since we created the Hetzner LoadBalancer to point at port 444 of our hosts, we can install any Ingress system there. We suggest the Nginx Ingress controller (https://kubernetes.github.io/ingress-nginx/deploy/#bare-metal). Modify the Deployment to use a hostPort:
Now traffic to your LoadBalancer should make it's way to your nginx ingress controller - and ingress is working properly!
Fix CPU frequency scaling
By default the Ubuntu 20.04 image on Hetzner uses a power-saving CPU profile. Newer Ryzen processors really benefit from the performance mode, so let's enable that (credit to davidjamesstockton's awesome article):
Storage systems
We install and manage Rook/Ceph for our clients. On Hetzner, the NVMe disk is used for the entire system, and is mounted in a RAID 0 fashion. Installing and managing a Rook cluster is out of the scope of this tutorial - but for the sake of sysadmin helpfulness, something like the following can be used in the Hetzner Rescue console to shrink the primary partition to make room for a storage system partition:
Overview
Not so bad! But plenty of pieces you may need a hand with - that's why we're here! Reach out to us if you're interested in our managed services! Topics we cover with our managed service that aren't addressed here includes Storage, Monitoring, Backups, Metrics, Logs, and more. KubeSail can assist with any part of building and managing your clusters!
Stay in the loop!
Join our Discord server, give us a shout on twitter, check out some of our GitHub repos and be sure to join our mailing list!
