Run WordPress + MySQL on Kubernetes
TL;DR: Press "apply" on each of the configs below and you'll be running a new WordPress blog.
WordPress is a nice example app for learning Kubernetes basics, because it involves a handful of moving pieces which most WordPress administrators are familiar with:
- You need to deploy the WordPress code
- You'll need a database system to store your blog's data
- You'll need some persistent storage for the database's data
- Finally, you need to expose the service to the internet
Kubernetes exposes a few high level resources which will help us get this job done:
- A PersistentVolumeClaim, which asks the system for a bit of disk storage
- A Secret, which will store our database password
- A MySQL Deployment, which controls the DB containers and their configuration
- Another Deployment for WordPress, similarly controlling the containers running PHP + WordPress
- A Service which allows WordPress to talk to our DB
- Finally, another Service, which exposes WordPress to the internet!
These are some of the high level resources that make up Kubernetes, and are the building blocks of your infrastructure. KubeSail provides an easy way to both learn and iterate on k8s resources. Click the "Apply" button to instantly deploy to your own KubeSail.com namespace!
For this tutorial we're going to stick fairly close to this article, and the YAML below will work on any Kubernetes cluster, from AWS or Google, to KubeSail Starter Tier! There are no KubeSail-specific details, no OS-specific details, and no Cloud-specific details! We will discuss the one point where you may want to make a different decision, which is usually when it comes to how you expose your application to the internet.
Configuring MySQL
Let's start with the PersistentVolumeClaim, which asks Kubernetes for some disk space:
Not so bad! We've asked for a very small slice of storage (50mb) which we'll use for our Database. Before creating our Database, let's first create a secret password, which we'll tell our Database and WordPress to use. K8s has a resource for encrypted things, called (naturally) Secrets. We can create one very simply like so:
NOTE: You should change the password below before clicking "apply"
Next step, let's spin up a MySQL database by way of a Kubernetes Deployment. These resources control how k8s deploys our applications, and allow us to specify things like what container image to use, how many instances to spin up, what disks should be attached, etc. Almost every application deployment option you can imagine is supported out of the box. See the documentation for more.
In this deployment, we're setting the environment variable
MYSQL_ROOT_PASSWORD from the secret you created earlier.Excellent! Now we have a fully fledged MySQL server up and running! Not so bad right? All of this can be added to version control, just remember to encrypt or ignore your Secrets!
Note that we used the imagekubesail/mysqlwhich is tuned to use less memory. but if you are running this on your own cluster or on the KubeSail Starter tier, you may want to use the standardmysqlimage.
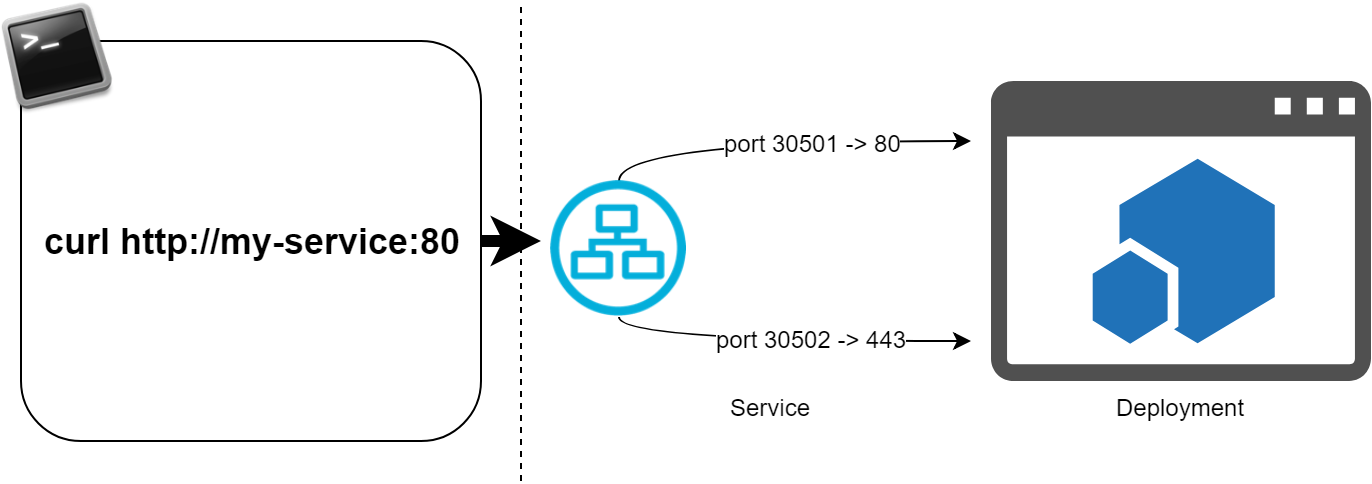
The next step is to define a way for us to reach our MySQL server. This is one of the most often confused parts when learning Kubernetes, so it's important to understand the terms clearly. We're going to be defining a Service for our MySQL Deployment.
- Deployments control how applications are started, stopped, and updated.
- Services control how clients access a given Deployment.
So, we'll be creating a MySQL service which points at our MySQL deployment.

You can think of a Service as a combination of a DNS record, a port-forwarding rule, and a load-balancer. Like Deployments, almost every conceivable option relating to exposing an application to a network can be defined in a Service. See the Services Documentation for more. Let's create one!
NOTE: For now, KubeSail manages Service objects for you, and you'll currently have read only access to this resource. For the purpose of this demo, the "Apply" button below will create the following service in your namespace for you. Of course, this service config will also work on any other k8s cluster!
Configuring WordPress
Next, we'll configure our WordPress Deployment:
The service above was created for us, and was given a name automatically. The value forWORDPRESS_DB_HOSTcomes from the name of the service that is generated by KubeSail, but if you are running this on your own cluster, you'll want to update this value to be the name of the service you created in the last step.
And finally, we need to expose our WordPress application to the world! There are many many many ways to do this, but KubeSail makes it very easy by allowing you to simply expose your app through our infrastructure (we'll handle HTTPS, load balancing, high availability, etc.) - click "Apply" to expose your WordPress instance!
Stay in the loop!
Join our Discord server, give us a shout on twitter, check out some of our GitHub repos and be sure to join our mailing list!
